 Close
Close

Share your calendar in Outlook 2016 for Windows
Share your calendar with other people at UCL.
Instructions
1. In your Calendar, right-click on your Calendar on the left-side calendar list and select Share > Share Calendar.

Fig 1. Illustration of how to get to the Share Calendar option
View a larger version
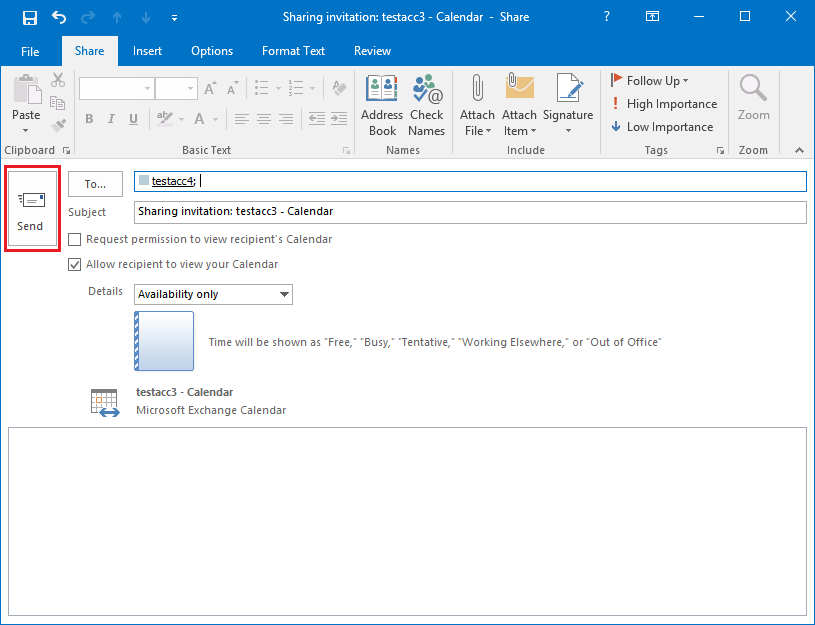
2. The Sharing invitations window will open for you to fill in the necessary details for this invite.
To… - Enter the recipients email address or search for them in the Global Address List (GAL).
Subject – Subject title for the invite.
Request permission to view recipient’s Calendar – check this box if you would like to request permission to view the recipient’s calendar.
Allow recipient to view your Calendar – this box should be checked in order to share your calendar
Details – select the permission level of how much detail you would like to share within your calendar. Options are Availability only, Limited details and Full details.
Message box – Type in any additional message for recipient’s in this box.

Fig 2. The Sharing invitation window
View a larger version
3. Once you have added all the relevant details, click Send.

Fig 3. Location of the Send button
View a larger version
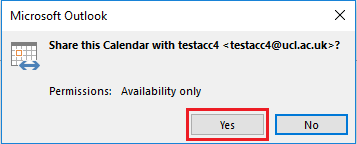
4. You will be prompted to confirm that you do want to share your Calendar. Click Yes.

Fig 4. Confirmation prompt that you want to share your calendar
View a larger version
5. You have now successfully shared your calendar with your chosen contacts.
Related guides and other info:
- Get started with calendar
- Change calendar view
- Create an appointment
- Modify an appointment
- Create a meeting
- Create a repeated meeting
- Create an all-day event
- Modify a meeting
- Accept a calendar share invitation
- View other people's calendar
Help and support
- Contact the IT Services.
Feedback
We are continually improving our website. Please provide any feedback using the feedback form.
Please note: This form is only to provide feedback. If you require IT support please contact the IT Services Help desk. We can only respond to UCL email addresses.